simple step-by-step guide to host WordPress website using Docker:
1. Install Docker & Docker Compose
If not already installed:
sudo apt install docker.io docker-compose -y
sudo systemctl enable docker
sudo systemctl start docker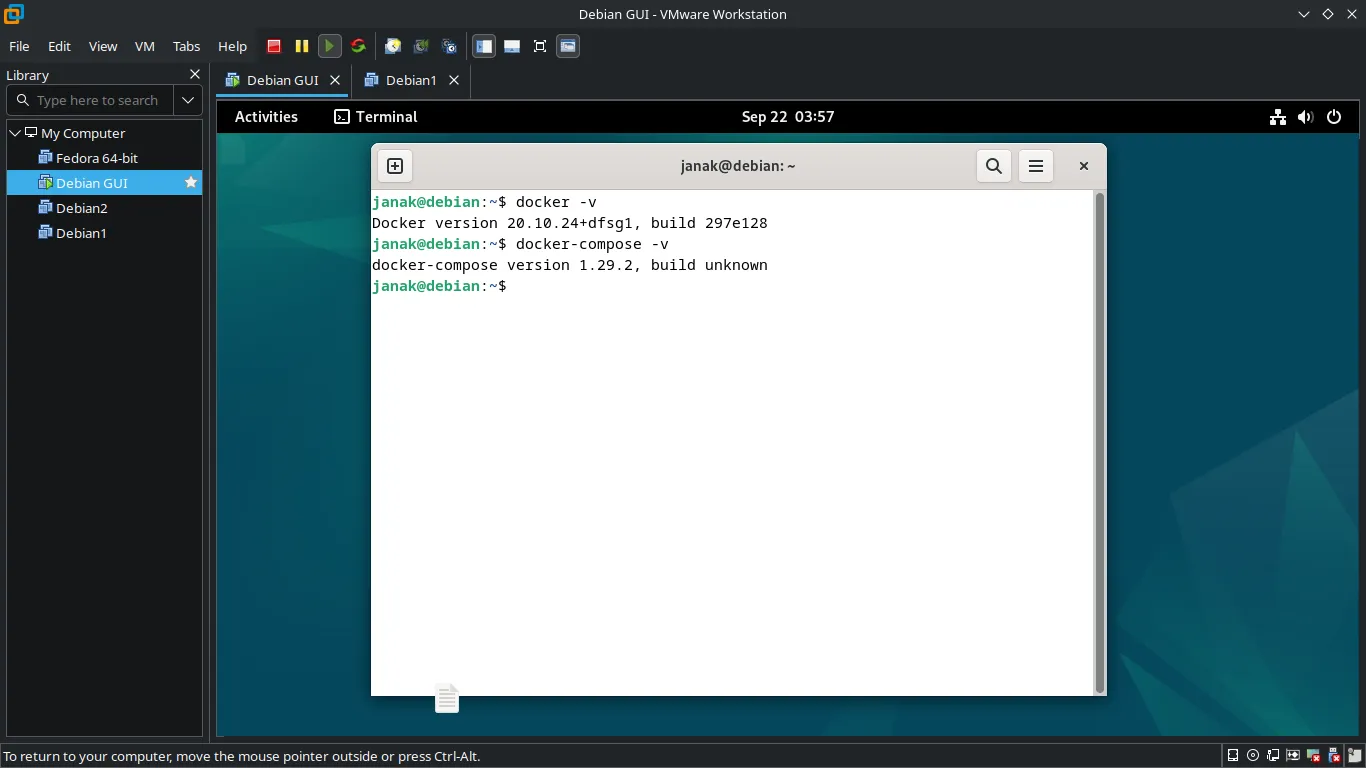
2. Create a Project Directory
mkdir Docker-wordpress && cd Docker-wordpress3. Create docker-compose.yml
Make a file called docker-compose.yml:
version: "3.9"

services:
  wordpress:
    image: wordpress:latest
    restart: always
    ports:
      - "8080:80"
    environment:
      WORDPRESS_DB_HOST: db
      WORDPRESS_DB_USER: janak
      WORDPRESS_DB_PASSWORD: janak0ff
      WORDPRESS_DB_NAME: janak
    volumes:
      - ./wordpress_data:/var/www/html

  db:
    image: mariadb:latest
    restart: always
    environment:
      MYSQL_ROOT_PASSWORD: janak0ff
      MYSQL_DATABASE: janak
      MYSQL_USER: janak
      MYSQL_PASSWORD: janak0ff
    volumes:
      - ./db_data:/var/lib/mysql

volumes:
  wordpress_data:
  db_data:
4. Start Containers
docker-compose up -d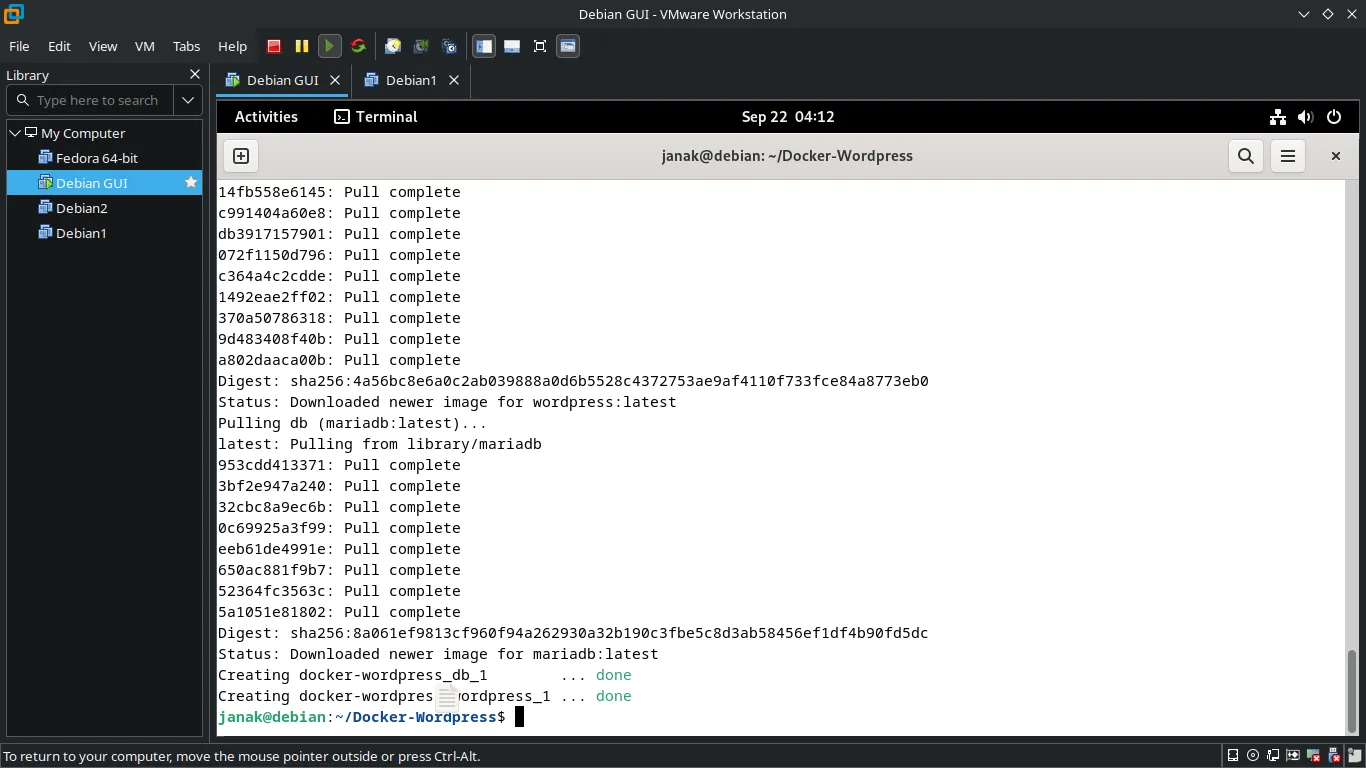
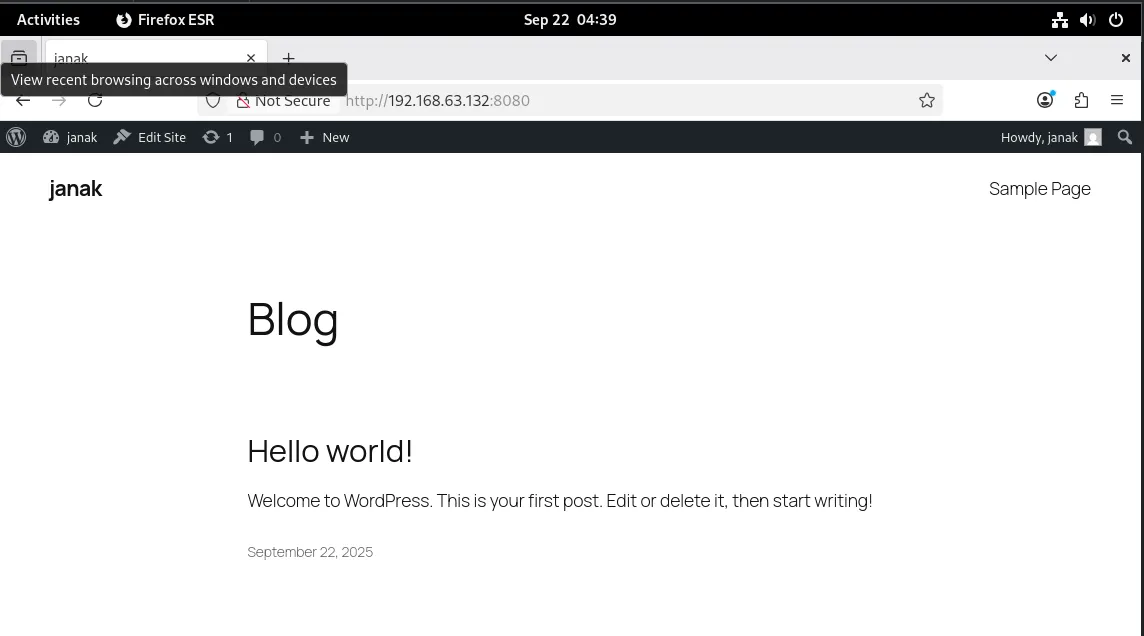
5. Access WordPress
Open in browser:
http://192.168.63.132:8080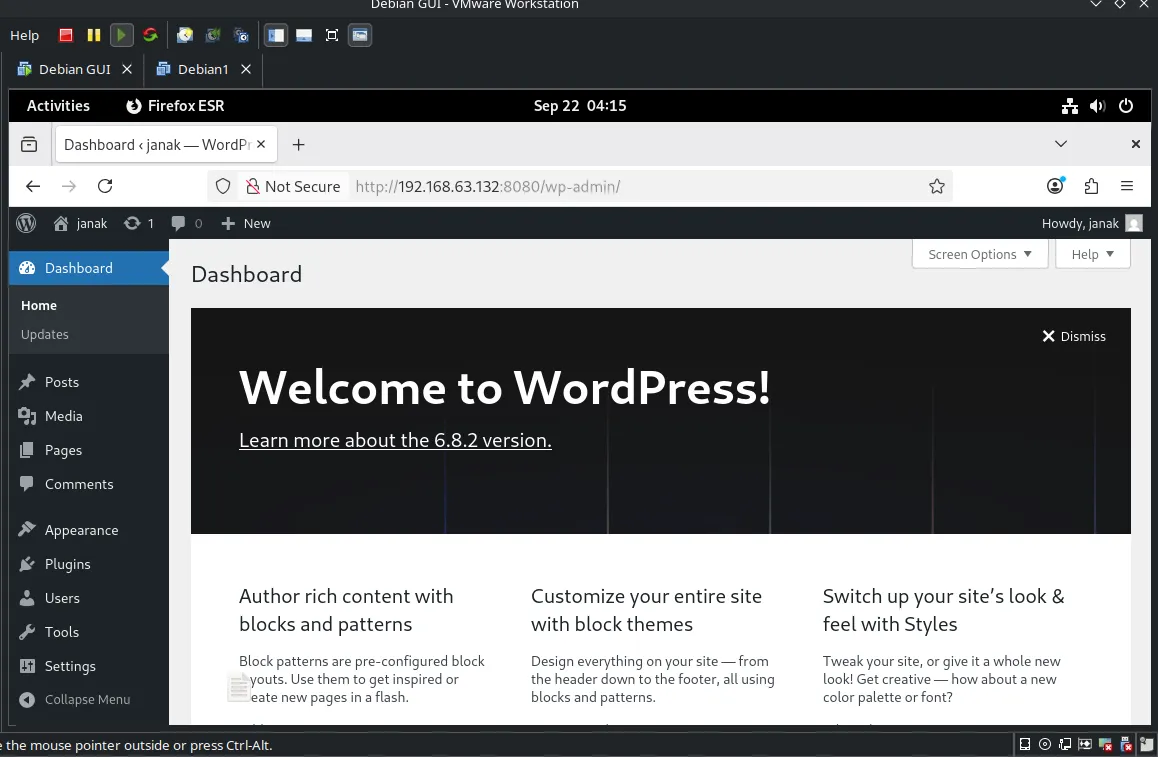
Hosting it with Apache Web Server
Apache HTTP Server is one of the most widely used open-source web servers. It allows you to host websites and applications, handle multiple domains on a single server, and even act as a reverse proxy to route traffic to backend applications running on different ports.
When you install Apache on a server, it listens on specific ports (by default, port 80 for HTTP and 443 for HTTPS). Apache uses Virtual Hosts to serve different websites or applications depending on the domain name or port.
There are two main types of web hosting with Apache:
-
Direct Hosting (Static/Dynamic Files)
- Apache directly serves HTML, PHP, CSS, and JavaScript files from a directory.
- Example: A WordPress site hosted in
/var/www/html/.
-
Reverse Proxy Hosting
- Apache doesn’t serve the app directly. Instead, it forwards incoming requests to a backend service running on another port (e.g., Node.js on
3000, Python Flask on5000, or WordPress on8080). - This is useful when your application runs on its own port but you want users to access it via a domain name.
- Apache doesn’t serve the app directly. Instead, it forwards incoming requests to a backend service running on another port (e.g., Node.js on
-
Install Apache
sudo apt update sudo apt install apache2 -y -
Enable Required Apache Modules For reverse proxy hosting:
sudo a2enmod proxy sudo a2enmod proxy_http sudo a2enmod headers sudo systemctl restart apache2 -
Create a VirtualHost Configuration Example:
/etc/apache2/sites-available/wp.conf<VirtualHost *:80> ServerName wp.janakkumarshrestha0.com.np ProxyPreserveHost On ProxyPass / http://127.0.0.1:8080/ ProxyPassReverse / http://127.0.0.1:8080/ ErrorLog ${APACHE_LOG_DIR}/wp-error.log CustomLog ${APACHE_LOG_DIR}/wp-access.log combined </VirtualHost>
-
<VirtualHost *:80>Tells Apache to listen on port80(HTTP) for all incoming connections. -
ServerName wp.janakkumarshrestha0.com.npDefines the domain name this configuration will respond to. -
ProxyPreserveHost OnKeeps the originalHostheader from the client request, ensuring backend apps see the real domain name. -
ProxyPass / http://127.0.0.1:8080/Forwards all requests from the root (/) to the backend running on127.0.0.1:8080. -
ProxyPassReverse / http://127.0.0.1:8080/Ensures that responses from the backend are correctly rewritten so that redirects and links point to the public domain instead of127.0.0.1:8080. -
ErrorLogandCustomLogStore error messages and access logs separately for this site, making debugging easier.
-
Enable the Site and Reload Apache
sudo a2ensite wp.conf sudo systemctl reload apache2 -
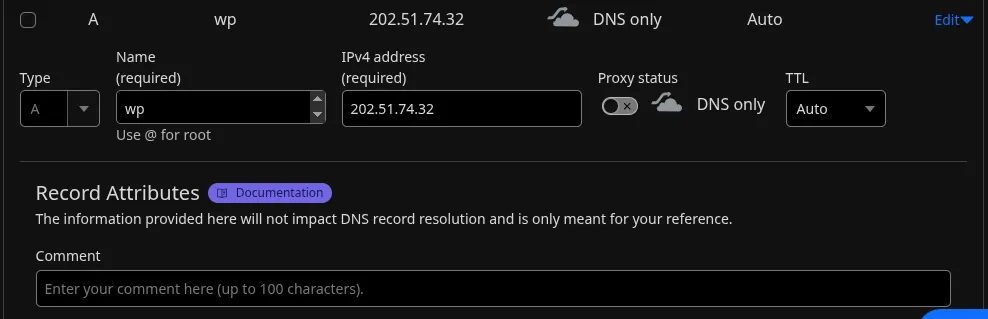
Point Your Domain to the Server In your DNS settings, create an A record for
wp.janakkumarshrestha0.com.nppointing to your server’s public IP.
-
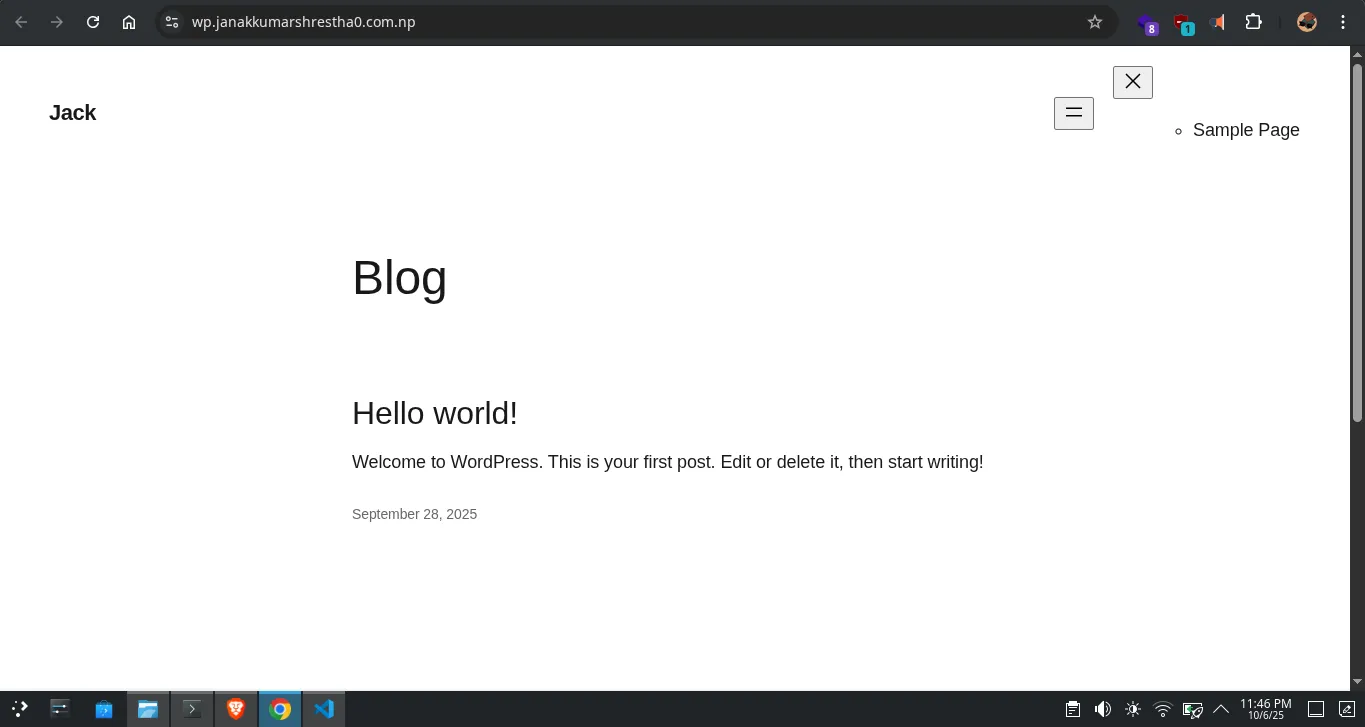
Access Your Application Now your app running internally on
http://127.0.0.1:8080/will be accessible via:http://wp.janakkumarshrestha0.com.np/
Enabling HTTPS with Let’s Encrypt SSL in Apache
Let’s Encrypt is a free, automated, and open Certificate Authority (CA) that provides SSL/TLS certificates to enable HTTPS. Combined with Certbot, we can easily install and configure SSL for our Apache-hosted site.
Steps to Enable SSL on Apache
1. Install Certbot and Apache Plugin
On Debian/Ubuntu:
sudo apt update
sudo apt install certbot python3-certbot-apache -y
2. Run Certbot for Your Domain
Use Certbot to automatically fetch and configure an SSL certificate:
sudo certbot --apache -d wp.janakkumarshrestha0.com.np--apache→ tells Certbot to integrate directly with Apache.-d→ specifies your domain name (make sure DNS is pointing to your server).
During the process, Certbot will:
- Verify your domain with Let’s Encrypt.
- Install the SSL certificate.
- Update your Apache VirtualHost configuration to listen on port
443. - Ask if you want to redirect all HTTP traffic to HTTPS (choose Yes).
3. Test the SSL Setup
Once finished, open:
https://wp.janakkumarshrestha0.com.np/4. Auto-Renewal (Important!)
Let’s Encrypt certificates are valid for 90 days. Certbot automatically creates a cron job for renewal. You can test it with:
sudo certbot renew --dry-runWhat Happens Behind the Scenes
After running Certbot, Apache will have a new VirtualHost block for HTTPS in /etc/apache2/sites-enabled/wp-le-ssl.conf, similar to:
<VirtualHost *:443>
    ServerName wp.janakkumarshrestha0.com.np

    ProxyPreserveHost On
    ProxyPass / http://127.0.0.1:8080/
    ProxyPassReverse / http://127.0.0.1:8080/

    ErrorLog ${APACHE_LOG_DIR}/wp-error.log
    CustomLog ${APACHE_LOG_DIR}/wp-access.log combined

    SSLEngine on
    SSLCertificateFile /etc/letsencrypt/live/wp.janakkumarshrestha0.com.np/fullchain.pem
    SSLCertificateKeyFile /etc/letsencrypt/live/wp.janakkumarshrestha0.com.np/privkey.pem
    Include /etc/letsencrypt/options-ssl-apache.conf
</VirtualHost>
SSLEngine on→ enables SSL for this VirtualHost.SSLCertificateFile→ points to the public SSL certificate.SSLCertificateKeyFile→ points to the private key (kept secure on your server).Include ...→ applies recommended SSL security settings.
✅ Conclusion
By setting up Let’s Encrypt SSL with Apache, we:
- Encrypted all traffic (HTTPS).
- Improved SEO ranking (Google favors HTTPS sites).
- Gained user trust with the secure padlock icon.
- Automated certificate renewal for long-term hassle-free security.
Now your web application is hosted professionally with HTTPS at:
👉 https://wp.janakkumarshrestha0.com.np/