Assign a static IP address in Ubuntu 24.04 Linux inside VMware
Check your network
ip aBackup the file (just in case):
sudo cp /etc/netplan/50-cloud-init.yaml /etc/netplan/50-cloud-init.yaml.bakSet a Static IP in Ubuntu
Now edit your Ubuntu Netplan config:
sudo nano /etc/netplan/50-cloud-init.yamlnetwork:
version: 2
renderer: networkd
ethernets:
ens33:
dhcp4: no
addresses:
- 172.16.25.150/24
routes:
- to: default
via: 172.16.25.2
nameservers:
addresses:
- 8.8.8.8
- 1.1.1.1Then apply:
sudo netplan applyVerify
ip addr show ens33
ip route
ping 8.8.8.8
ping google.com
Connect to your Linux Virtual Machine (VM) terminal from an host via SSH.
Understand What SSH Is
SSH (Secure SHell) is a protocol used to securely log into another computer over a network. It encrypts all communication between two systems.
Check If SSH Server Is Installed on Linux VM
Most Linux distributions do not install the SSH server by default for security reasons.
To check if openssh-server is installed:
sudo systemctl status sshIf you get something like “active (running)”, then SSH is already installed and running.
If not:
Install OpenSSH Server
For Ubuntu/Debian-based distros:
sudo apt install sshAfter installing, start the SSH service:
sudo systemctl start sshEnable it to start automatically on boot:
sudo systemctl enable sshConfigure VM Firewall (UFW/firewalld):
UFW (Uncomplicated Firewall) in Linux is a user-friendly command-line tool designed to simplify the management of firewall rules. It acts as a frontend for the more complex iptables firewall system, making it easier for users to allow or block network traffic on their Linux systems, particularly Ubuntu and Debian-based distributions.
Ensure the VM’s internal firewall allows incoming SSH connections (default port 22).
- Now, install the ufw package. (Ubuntu/Debian):
sudo apt install ufwsudo ufw allow ssh # This allows port 22/tcp OR sudo ufw allow 22/tcp
sudo ufw enable # If not already enabled
sudo ufw status verbose # helps to provide a richer and more detailed description of their operation.Find the IP Address of the Linux VM
ip a
# OR
ifconfig # if net-tools is installed
Connect to the VM Using SSH From Host Machine
Now open a terminal on your host machine (your main OS), and type:
ssh [email protected]Then press Enter and type the password when prompted.
If successful, you’ll now be inside the Linux VM’s terminal — but connected via SSH!
Set up SSH key-based authentication.
This method is more secure than using passwords and allows you to log in without typing a password every time.
What Is SSH Key-Based Authentication?
SSH keys are a pair of cryptographic keys:
- Private Key: You keep this on your local machine (host), and it must be kept secret.
- Public Key: You copy this to the server (your Linux VM). It’s safe to share.
When you connect via SSH, the system checks if your private key matches the public key on the server.
Guide to Set Up SSH Keys
We’ll do this from your host machine and then copy the public key to your Linux VM.
Generate an SSH Key Pair on Your Host Machine
Open a terminal on your host machine (not the VM).
Type:
ssh-keygen -t rsa -b 4096This command generates a strong RSA key pair with 4096 bits.
Then it asks:
Enter passphrase (empty for no passphrase):You can leave it empty or set a passphrase for extra security.
Done! Your keys are now created:
- Private key:
~/.ssh/id_rsa - Public key:
~/.ssh/id_rsa.pub
Copy the Public Key to Your Linux VM
There are two common ways to do this:
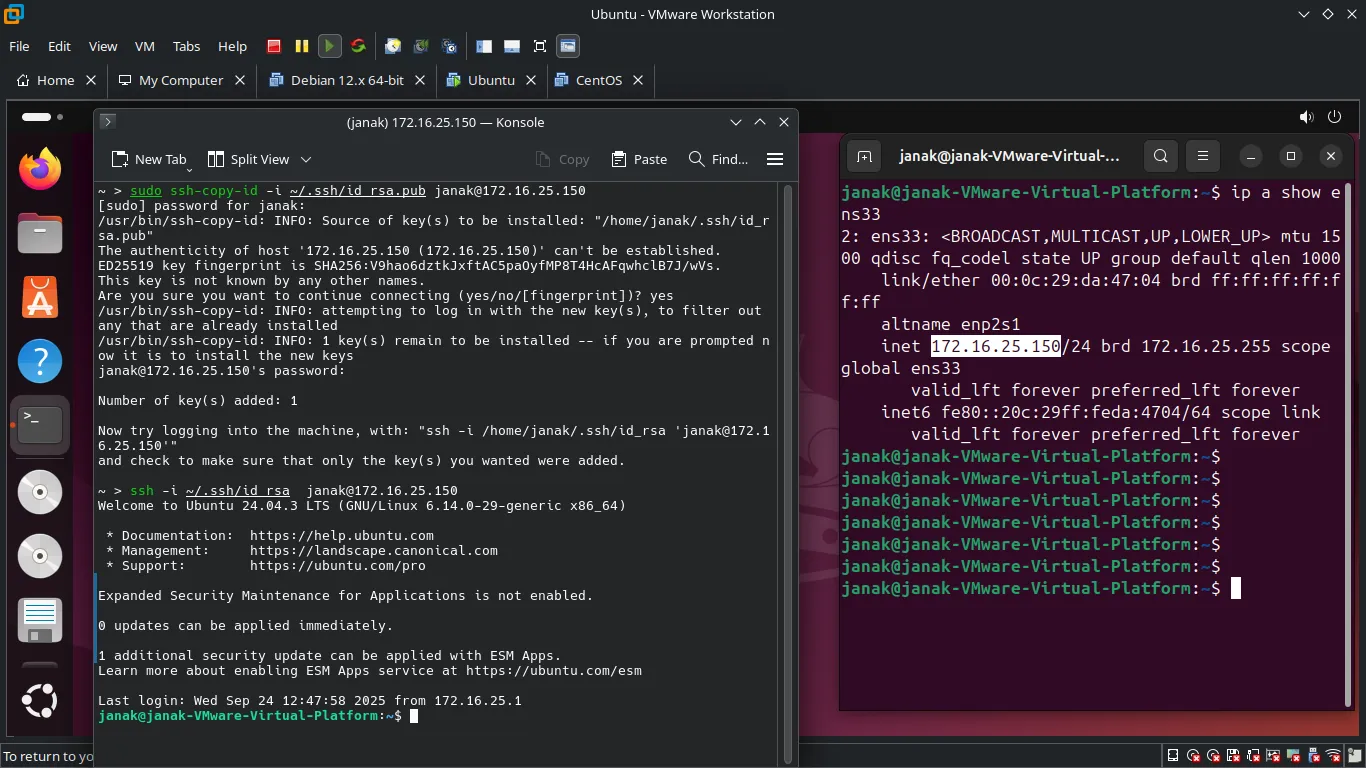
🔹 Option A: Use ssh-copy-id (Recommended)
Run this on your host machine:
sudo ssh-copy-id -i ~/.ssh/id_rsa.pub [email protected]Replace:
usernamewith your Linux VM username.vm-ip-addresswith the IP of your VM.
If successful, you’ll see:
Number of key(s) added: 1🔹 Option B: Manually Copy the Key (if ssh-copy-id not available)
On your host machine, view your public key:
cat ~/.ssh/id_rsa.pubNow, log in to your Linux VM normally via SSH:
ssh [email protected]Once inside, create the .ssh directory and edit the authorized_keys file:
mkdir -p ~/.ssh
chmod 700 ~/.ssh
nano ~/.ssh/authorized_keys
Paste the public key into the file and save it (Ctrl+O, Enter, Ctrl+X in nano).
Set correct permissions:
chmod 600 ~/.ssh/authorized_keysTest SSH Without Password
Now try logging in again:
ssh [email protected]If everything went well, you should be logged in without being asked for a password!
Based on your ip a output, your primary network interface is ens33. To set a static IP, you’ll need to edit the network configuration file and specify the new static details for this interface.
How to Set a Static IP on Debian
-
Identify the Network Interface: From your output, the interface with a dynamic IP is
ens33. You can see its current dynamic IP is192.168.193.128. -
Edit the Network Configuration File: Open the
/etc/network/interfacesfile using a text editor likenanowith administrative privileges.sudo nano /etc/network/interfaces -
Add Static IP Configuration: Locate the section for
ens33and change it fromdhcp(or similar) tostatic. Add the following lines, replacing the placeholder values with your desired settings.# The primary network interface auto ens33 iface ens33 inet static address 192.168.193.150 # Your new static IP address netmask 255.255.255.0 gateway 192.168.193.1 # Your router's IP address dns-nameservers 8.8.8.8 8.8.4.4- address: Choose a static IP within the same subnet as your current IP (
192.168.193.x), but outside of your router’s DHCP range to avoid conflicts. For this example,192.168.193.150is a good choice. - netmask: This is typically
255.255.255.0for home networks. - gateway: This is your router’s IP address. Based on your current IP, your gateway is likely
192.168.193.1. You can confirm this with theip routecommand. - dns-nameservers: These are the IP addresses of your DNS servers. Google’s public DNS (
8.8.8.8) is a reliable option.
- address: Choose a static IP within the same subnet as your current IP (
-
Save and Exit: Press
Ctrl + X, thenY, andEnterto save the changes and close the editor. -
Restart the Network Service: Apply the changes by restarting the networking service.
sudo systemctl restart networking -
Verify the New IP: Run
ip aagain to confirm thatens33now shows the static IP address you assigned.